When we talk about agriculture, we speak about small scale and organic farming.
We don’t use any genetically modified organisms and chemical pesticides/herbicides.
Why? Because
• Organically grown food is healthier.
• It is, when done in a small scale, cost efficient.
• Once a functioning ecosystem is created, it causes much less work.
• It ensures biodiversity of flora and fauna.
• It is not harmful for the groundwater.
Many of our alumni have projects that involve agriculture, either as a main or as a side activity. If you are providing food for your colleagues, your students and/or beneficiaries , being able to grow your own food is extremely satisfying. But there is also a political or more philosophical angle to practicing agriculture. You become independent of agro-corporates; you have full control of your own seeds; you can create your own micro climate, and you have the perfect training ground for your beneficiaries to spread the methodology.
Table of Contents
Urban farming
Even if you live in the city and you have limited space, you can still grow some vegetables and fruits in old buckets, pots and other boxes. If you don’t have terraces or balconies, use window-sills or steps.
Here are some links where you can find some ideas:
https://gardeningwow.com/urban-farming-for-beginners/
This website has a mix of commercially available and DIY ideas for urban farming techniques like hydroponics, aquaponics, aeroponics, etc.
https://grocycle.com/small-scale-farming-ideas/
Along the same lines as the above but contains many more ideas (21 to be exact), including how to grow different types of plants and mushrooms.
Permaculture
(By Ragunath Veeravel, 2019 kanthari. www.aaranya.org)
(Taken from: https://www.permaculture.co.uk/what-is-permaculture)
Permaculture, originally ‘Permanent Agriculture’, is often viewed as a set of gardening techniques, but it has developed into a whole philosophy of design.
Permaculture is a framework for creating sustainable ways of living. It is a practical method of developing ecologically harmonious, efficient, and productive systems that can be used by anyone, anywhere.
Permaculture is a human-created ecosystem that provides food for human needs, but it uses natural patterns as inspiration.
Advantages of permaculture
Following the patterns of nature makes the system more sustainable since the ecosystem is the only sustainable system, as long as humans do not interrupt it.
Permaculture can be more efficient than a regular farm. You can produce more with fewer resources in comparison to common agricultural methodologies.
One of the best tools for farm planning and for the development of the current permaculture is that which has been developed by the Australian agricultural designer P.A. Yeomans.
What to consider for permaculture
There are eight factors to be followed in permaculture:
A) Understand your local climate
The most permanent agricultural factor is climate, and it is fundamental to every aspect of the farm.
Temperature: Most seeds grow when the soil temperature is between 20 and 30 degree Celsius.
Insulation, exposure to sun’s rays: Minimum 8 hours of sunlight is required.
Wind: You need to block strong winds.
Annual distribution of humidity: Humidity refers to the presence of water vapour in the atmosphere. It is most important to obtain these data from your local area climate pattern.
Rainfall: Irregular rain pattern may cause damage to the farm.
B) Develop water supply
Water and rainfall will determine your farm’s development. When developing water systems, we need to consider the storage, harvesting and layout of the available water sources. You need to take utmost care to plan your water systems, such as ponds, ditches, water harvesting tanks, etc. (See water bodies [4-02C/4.1])
You may as well also use them for fish production. (See fish farming [4-02C/6.1])
All the water lines (diversions, swales, terraces, dams/ponds, channels) will become permanent land features.
C) Define access points through paths
To be able to reach any part of the farm efficiently, you need to develop roads/paths. Tracks and paths are permanent features in the landscape, and it is especially important to consider their locations early in the process. The placement of access points will define your movement around the farm. Roads may change the natural drainage pattern and serve as hard surface runoff. Therefore, it is necessary to place your roads in such a way that they prevent the erosion and concentration of the runoff. (See construction of paths [4-02C/4.3])
D) Restore existing buildings and introduce new structures
When introducing new structures, their placement should follow earlier factors, as these have already indicated the most suitable locations for the permanent farm buildings. Buildings shouldn’t be overly exposed to the wind; they should ideally be built on a slope (if there is a slope). If you plan to build sheds or other structures, try to position them higher than the house in order to utilize their water tanks as a gravity-fed water source for your home. (See construction [4-02C/3.1])
E) Subdivide your farm with fencing
Fences can also be considered as a part of the infrastructure, but they are less permanent than the other infrastructure components. It can be permanent, flexible, or mobile fencing. It is more common to use permanent fencing along the boundary of your farm and flexible fencing to subdivide your farm area.
F) Improve your soil
Soil life requires air, water, minerals and living biology, like microbes, worms, spiders, etc. When developing a farm, if the land is not fertile already, we need to prepare the soil as soon as possible. The goal is to improve the fertility of the soil for it to provide the maximum benefits. Simple techniques can be used, like cover cropping, mulching, erosion control and even the starting of microbial inoculation through biofertilizers and compost teas.
• Cover cropping is done with plants, which are planted to cover the soil rather than for the purpose of being harvested. They will prevent water from evaporating so that the soil stays moist and will then be ideal for bacteria to multiply.
• Mulching: It is a layer of material applied to the surface of the soil. The reasons for applying mulch include conservation of soil moisture and improving the fertility and health of the soil.
• Erosion control: It is the practice of preventing or controlling wind or water erosion in agriculture and land development. Roots of different kinds of plants/trees will bond the soil.
• Microbial inoculation: It is an act or process of introducing microorganisms (e.g. bacteria) into the soil, where they will grow and reproduce.
• Biofertilizer: It is a substance which contains living microorganisms. When applied to seeds, plant surfaces, or soil, it promotes growth by increasing the supply or availability of primary nutrients to the host plant.
• Compost teas: It is a liquid produced by extracting bacteria, fungi, protozoa and nematodes from compost. Compost tea production is a brewing process that is as simple to master as making a home brew.
G) Plant trees and crops
When it comes to tree planting, in general, the pattern should be based on the shape of the land and the types of plants. (See Natural forest [4-02C/4.4] and food forest [4-02C/5.4])
Plants grow in nature in a stacked layout, with trees forming the canopy, shrubs below them, then herbaceous plants below these, and ground cover plants at the lowest level, with root crops beneath the ground, and vines growing vertically in the background. (See Food forest [4-02C/5.4])
Using this layout allows a greater utilization of space, and greater productivity for a given garden area.
H) Introduce animals
Animals are an integral part of the agricultural enterprise and regenerative ecology. Introduce your animals once you have established your seedling trees or at the same time as during planting. Temporary fencing will give you the flexibility to move them around and to protect your trees and other plants, and you can also use them for an additional boost to the soil fertility. (See animal husbandry [4-02C/6])
I) Develop a farm economy
There are several ways to run your farm: for training purposes, for income generating purposes, for organizational food supply purposes, or a combination of the above. If it doesn’t distract from the daily operations and it can bring in additional funds, you should definitely look into this. (See entrepreneurship [0-00B])
More information can be found at: https://permacultureapprentice.com/how-to-set-up-a-permaculture-farm/
To plant or not to plant
A) Good and bad neighbors
When planting vegetables, you need to consider which vegetables make good neighbors and which should not be planted together. The reason is not really known. But these insights come from experimenting. Some vegetable plants might “steal” nutrients and water from each other. Others help to control pest.
• Cucumbers grow well near bush beans.
• Beans, cabbages, beets, carrots, cauliflowers, corn, cucumber, and strawberries can be planted together; they are good neighbors.
• But you will need to plant all the above away from: onions, garlic, and shallots.
• Don’t plant lettuce and radish next to potatoes.
• Good to grow next to each other: pepper, carrots, eggplant, onions, parsley, and tomatoes.
• But do not plant kohlrabi anywhere near them.
• Keep lettuce away from cabbage.
• Keep onions away from asparagus, beans and peppers.
• You can plant spinach anywhere it goes, along with every vegetable.
• Keep tomatoes away from corn because they share the same fungi and parasites.
• The same for potatoes and tomatoes, and peppers and tomatoes.
B) Shade versus sun
Pair plants in such a way that the shade-loving, small-growing plants and the sun-loving, tall-growing plants stand together.
Pumpkins should be between corn. These are companion plants. Both need sunlight in the early stage. Later, only the corn wants full sun, and the pumpkins are happy with being in the shade of the tall-growing corn.
For more info, follow the link: https://homeguides.sfgate.com
Organic fertilizers
An organic fertilizer is normally made up of single ingredients, and can be matched to your garden’s particular nutritional needs. The various types of organic fertilizer can come from plant, animal, or mineral sources. Different organic fertilizers add different nutrients and ingredients to the soil. The materials you need depend completely on your soil and the plants you are growing in your garden.
Different types of organic fertilizers:
A) Plant-based fertilizers:
They break down quicker than other organic materials, and they offer moisture to the soil.
Some examples: cottonseed meal, cover crops, compost tea (Fill a bucket of water; let it stand for 24 hours; pour in compost, and regularly stir it. After 24 to 48 hours, it’s good to be put on the plants.)
B) Animal-based fertilizers:
Animal-based fertilizers, such as manure, bone meal or blood meal, add lots of nitrogen to the soil. They are great for leafy plants and for strong growth in the early weeks of gardening.
Other animal-based fertilizers: fish emulsion, milk, urine (mixed one to ten with water) and manure tea (similar to compost tea).
C) Mineral-based fertilizers:
Mineral-based fertilizers can add nutrients to the soil, as well as raise or lower the pH level, when needed, for healthy plant growth. Examples: calcium and Epsom salts (magnesium & sulphur).
D) Treated sewage sludge:
Treated sewage sludge, also known as biosolids, is effluent that has been treated, blended, composted, and sometimes dried until deemed biologically safe.
It is mostly used on non-agricultural crops.
More details at: https://www.gardeningknowhow.com/garden-how-to/soil-fertilizers/types-of-organic-fertilizer.htm
Composting
Compost, also known as “black gold”, is decomposed organic material. Compost is made with materials such as leaves, shredded branches, and kitchen scraps of plants/vegetables.
A) Advantages of using compost: compost improves:
• sandy soils,
• water-holding capacity;
• it adds organic matter;
• in general, it improves the plants’ growth and health.
B) The composting process
The composting process involves three main components:
• Organic matter:
This includes plant materials and some animal manure.
It is a mixture of brown organic materials (for example: leaves, branches, manure) and green organic materials (example: lawn clippings, fruit rinds, etc.). Brown materials supply carbon, while green materials supply nitrogen. The best ratio is 1-part brown to 1-part green material.
• Moisture:
Moisture supports the composting process. If the pile is too dry, the materials will decompose very slowly; add water during dry periods. If the pile is too wet, turn the pile, and mix the materials.
• Oxygen:
Oxygen is needed to support the breakdown of plant material by bacteria. To supply oxygen, you will need to turn the compost pile so that the materials at the edges are brought to the center of the pile. Turning is important for complete composting and for controlling the smells. When turning the compost pile, make sure that the materials in the center are brought to the outside edges, and that the materials from the outside edges are brought to the center. You can also dig small holes into the compost pile.
• Bacteria:
Bacteria and other microorganisms are the real workers in the composting process. By supplying organic materials, water, and oxygen, the already present bacteria are enabled to break down the plant material faster into useful compost. In addition to bacteria, larger organisms including insects and earthworms are active composters.
C) Creation of compost
Here are simple steps to create compost:
Step 1: Find a cool half-shady place so that the compost is not dried out by the sun. Make sure that you have easy access to the compost pile to add further organic materials. It should be airy so that it can contain a lot of oxygen but not so windy that the material is blown all over the place.
Step 2: Build a box or a bed for the compost pile. Don’t put the composting material in a plastic box. Rather, keep all the material in a stone bed or, better, in a cubicle built of mesh. This will ensure access to oxygen. The box or bed should not be too high. You need to be able to turn the pile regularly. Don’t make a solid floor so that the access water can drain into the ground and insects can easily find the compost. Mesh on the ground or just the earthy ground itself, without a solid floor, works. You could also have two or three boxes so that you can shift the compost from one to another. As for an ideal size, the bed/box should be one cubic meter.
Step 3: Start with finely cut twigs, shrubs and leaves. Then make layers of organic substances. Make sure that it is not too wet and not too dry. Shift it every 5 days. Sometimes when there is a lot of rain, you should cover the compost for a little while. Otherwise, the nutrients would be washed out by too much water. Mix layers of kitchen waste and garden waste. You can also add half-rotten compost on the top, which helps as a starter. If it is too wet, you can also add carton or paper.
D) Dos and Don’ts:
Don’ts
• Cheese, meat or meat bone as well as fish and fish bone (neither cooked nor raw)
Why not: It attracts rats, and rats can bring diseases.
• Citrus fruits. Why not: They are too acidic, and the rinds are usually filled with pesticides.
• No sick plants
• Commercial disposable diapers that contain plastic and other chemical substances
• Cat or dog poop
• Vacuum cleaner bags
• Ashes from wood
• Glass
• Plastic
• Metal
Do’s:
• Sawdust
• Coffee or tea filter bags
• Leftovers from vegetables or fruits (both cooked and raw)
• Straw
• Eggshells and twigs of shrubs and trees (need to be cut in small pieces)
• Leaves
• Bark
• Chicken manure (for phosphor, but not too much)
• Cow, pig, and goat manure
• Freshly cut grass (but not too much at once)
E) When is the compost ready for the farm?
This depends on what you add to the compost. Not everything rots at the same speed. Also, it helps if the organic materials are cut into small pieces. Additionally, the higher the temperature, the faster it is ready. To speed up the process, you need to turn the pile and shift it into different boxes.
For the ripening process, you have different kinds of compost:
• Young compost:
Fresh compost has too many nutrients and cannot be used for the roots of the plants.
• Mature compost
It gives out the nutrients only slowly. You won’t be able to over fertilize. You can smell forest earth. It is dark brown to black. If you find non-rotted materials, please take them out and throw them onto the younger compost.
Mature compost is best for the plants.
• Compost earth
The more you wait, the more the mature compost becomes compost earth. Compost earth does not contain as many valuable nutrients. It can be used as mulch material.
The process of composting is divided into 4 phases:
Phase 1: Pre rotting (up to 40 degrees Celsius)
Phase 2: Hot rotting (up to 60 degrees Celsius; in cold countries, you can use the temperature to heat water or to keep food boxes hot)
Phase 3: Main rotting (up to 40 degrees Celsius)
Phase 4: Post rotting (up to 30 degrees Celsius)
Using compost in the farm:
Apply an eight-centimetre layer of compost into your garden as you prepare the soil for the planting season. Use the compost as mulch around flower beds, vegetable gardens, and trees or shrubs.
The best way to find out about the most efficient composting process for your area is to find farmers that have been working on this already and ask about their experiences.
More info can be found at: https://web.extension.illinois.edu/compost/process.cfm
Organic pesticides and herbicides
Organic pesticides can allow farmers to control pests and diseases that affect their plants without resorting to conventional chemical pesticides. Pesticides are toxic, not just to the environment but also to humans and animals. Exposure to these chemically loaded pesticides has been associated with serious illnesses and has been the cause of a number of health defects. However, in comparison to chemical pesticides, organic pesticides can be much more easily decomposed by the environment.
Here is a list of some all-natural, inexpensive, organic pesticides.
A) Neem leaf: It has long been used for its medicinal and culinary properties. It is also known to be used as a pest deterrent. This medicinal herb has a bitter taste and a strong smell that may keep the bugs away from your plants, but it is non-toxic to animals, birds, plants and humans. It is best to spray neem oil on young plants, where it is said to be effective for about 22 days.
B) Salt spray: One of the best and most natural ways to keep pesticides away from your home is spraying salt. In fact, not only does it help deter pests, it also helps increase nutrition absorption, like magnesium, and helps plants take up vital nutrients like phosphorus and sulphur. You should add some salt in water and stir the solution well. Put it into a spray bottle and sprinkle on the plants. You can also sprinkle some salt around the base of your plants, reapplying it every week.
C) Onion and garlic spray: Take about one clove of garlic and one medium-sized onion, and add some water to them. Let it stay for a while before you add a teaspoon of cayenne pepper and a dash of liquid soap to the mix. Use it on your plants to ensure that no bug infests your produce.
D) Eucalyptus oil: The strong smell of eucalyptus oil deters insects and bugs. All we need to do is spray some oil on our plants and see the results. Repeat it regularly if necessary.
E) Chrysanthemum flower tea: Chrysanthemum flowers are said to hold a powerful plant chemical compound known as pyrethrum. This substance is believed to damage the nervous system of insects and pests. All you need to do is boil some dried flowers in a pan full of water for about 20 minutes, and then strain, cool and add it into your spray bottle. This solution can be stored up to two months. To make it more effective, you can add some neem oil to it.
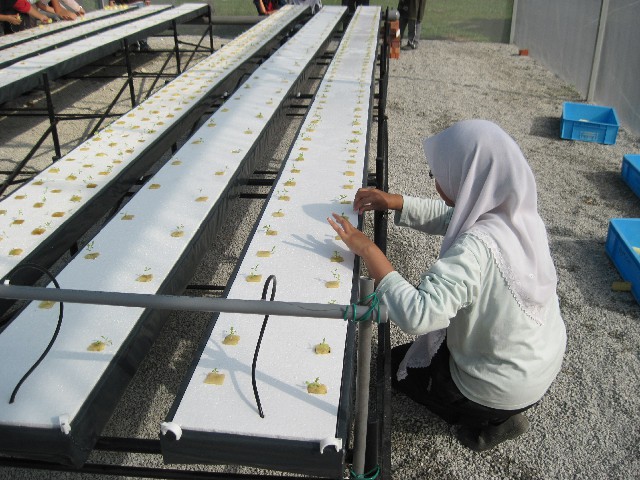
Hydroponics
(By Ragunath Veeravel, 2019 kanthari. www.aaranya.org)
Taken from the following sources. Please check them out for further details:
https://blog.seedsman.com/an-introduction-to-hydroponics/
https://www.advancednutrients.com/articles/easy-hydroponics-beginners-guide/
https://www.igrow.news/igrownews/how-to-start-growing-with-hydroponics-for-beginners
https://www.madgetech.com/posts/blogs/top-3-pros-and-cons-of-hydroponic-systems/
Hydroponics is the method of cultivating plants without using soil. Nutrients are dissolved in water and can thus be applied directly to the plant’s root system through flooding, misting, or immersion. This method needs 90% less water than traditional agriculture and is therefore suitable in especially dry areas. Additionally, hydroponic gardens grow fruits, vegetables, and flowers in half the usual time. When plants are grown in soil, their roots continually search for the necessary nutrition to support their growth. When the roots are constantly dipped in ‘food’, they ‘feed themselves’ 24/7.
Advantages and disadvantages of hydroponics
There are many reasons why people want to get into hydroponic plant growing. Here are the most important points:
A) Advantages
• Faster growth:
Plants grow faster with hydroponics; it is a more efficient way of growing. Most experts agree that plants grow at least 20% faster with hydroponics vs soil.
• Higher yields:
Experts agree that we can expect at least 20-25% more yields with hydroponics as compared to growing in soil.
• No soil:
This can be a benefit because you may live in an area where there is no good soil to grow plants outside. Or perhaps you do not have any outside area because you live in an urban area. With a hydroponic method, you can still grow plants.
• Space saving:
Because your plants don’t need to spread their roots out into lots of soil in order to get the nutrients they need (because they’re surrounded by oxygenated, nutrient-rich water solution), you can pack more plants closer together. This saves a lot of space. Again, this is perfect for urban dwellers who want to grow a lot of plants in a little space.
• Water saving:
Because you are using reservoirs that are covered (to prevent evaporation) and no water seeps out of the bottom (because it is sealed), the plants take up the exact amount of water they need at any one time, and the rest remains in the reservoir to be used later. Compare this with soil gardening, where you must water your plants daily, and most of the water is wasted.
• No weeds:
One of the most tedious, time-consuming, and frustrating activities for many gardeners is cleaning their gardens and pulling out weeds. With hydroponic growing, there are no weeds to pull.
• Less diseases & pests:
Because you are not using soil, you also get rid of a lot of soil-borne diseases and pests that can normally cause disaster on your plants and make gardening a pain.
B) Disadvantages
While there are many more benefits to hydroponics, there are a few considerable downfalls to be aware of:
• Setup costs:
This is, by far, the biggest disadvantage. Whether you are going big or small, the initial setup of a hydroponic system is expensive.
• Equipment failure:
This is a risk with hydroponics. If a piece of the system (like a water pump) fails, the plants can be killed off within a matter of hours. When there is no nutrient-rich water for the plants to feed on, they will die fairly fast.
Read more about hydroponics at: https://www.freshwatersystems.com/blogs/blog/what-are-hydroponic-systems
Basics of hydroponics
The hydroponic method works under a remarkably simple principle; it provides the plants exactly what they need and when they need it.
In a hydroponic system, environmental conditions like temperature, pH balance, and maximized exposure to nutrients and water are all controlled.
It determines and controls exactly how much light the plants need to receive and for how long. In a highly customized and controlled environment, plant growth accelerates.
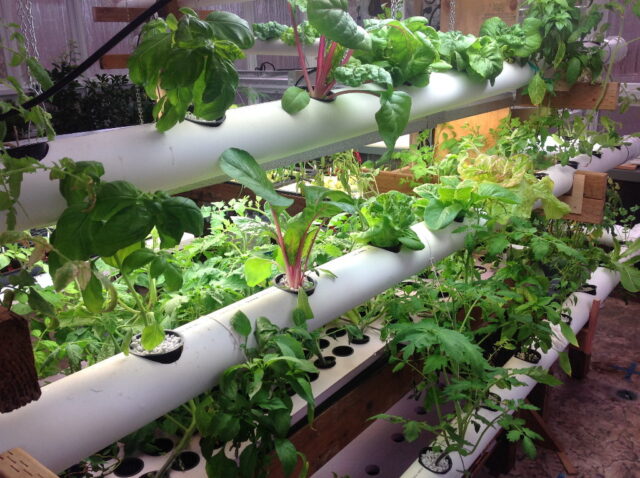
Components of a hydroponic system
We need three important components that make hydroponics run efficiently.
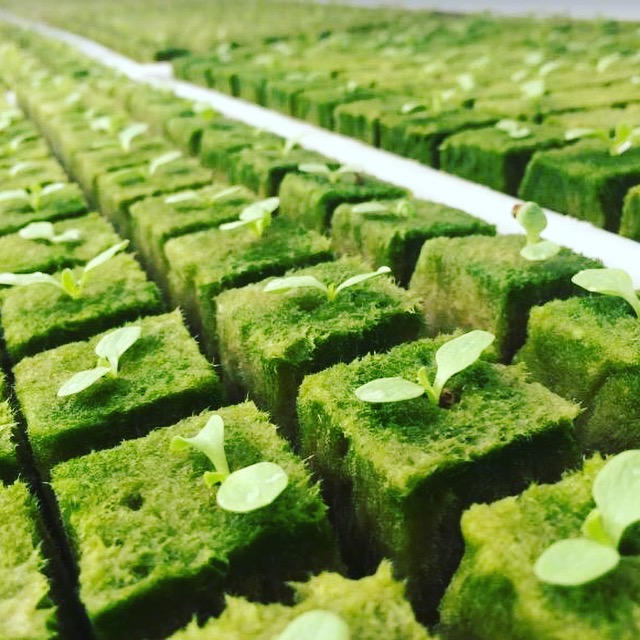
1. Growing media: the substitute for soil.
This substance does not provide any nutrition to the plant. Instead, it absorbs/retains moisture and nutrients from the water to deliver it to the plant.
Most growing media are also pH-neutral, so they will not upset the balance of your nutrient solution. It is widely available both online and at local nurseries and gardening stores.
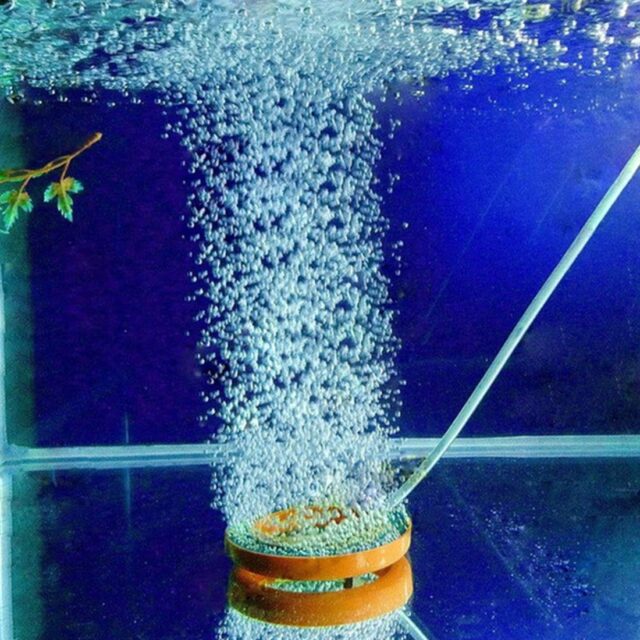
2. Air stones and air pumps:
Plants that are submerged in water can quickly drown if the water is not sufficiently aerated. Thus, air stones are important. Air stones are made of perforated ceramic through which air passes while dispersing tiny bubbles of dissolved oxygen throughout your nutrient solution reservoir.
These bubbles also help evenly distribute the dissolved nutrients in the solution. Air stones do not generate oxygen on their own. Thus, they need to be attached to an external air pump via opaque food-grade plastic tubing (the opacity prevents algae growth from setting in). Air stones and air pumps are popular aquarium components and can be purchased easily at pet stores.
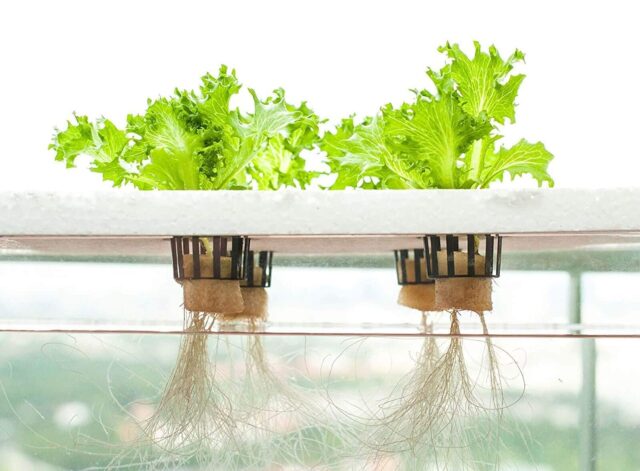
3. Net pots:
Net pots are mesh planters that hold hydroponic plants. The latticed material allows roots to grow out of the sides and bottom of the pot, giving them greater exposure to oxygen and nutrients. Net pots also provide superior drainage compared to traditional clay or plastic pots.
Types of hydroponics
There are hundreds of methods in implementation, but all of them are a modification or combination of the six basic hydroponic systems.
A) Deep water culture systems:
Deep water culture systems are also known as DWC systems, one of the easiest and most popular methods of hydroponics on the market. A DWC system dangles net pots holding plants over a deep reservoir of oxygen-rich nutrient solution. The plant’s roots are submerged in the solution, providing it with continuous access to nutrition, water, and oxygen. Deep water culture is considered by some to be the purest form of hydroponics. In DWC systems, except roots, no part of the stem or vegetation should be underwater.
B) Wick systems:
Wick systems work through a process called capillary action. Plants are nestled in the growing media on a tray that sits on top of a reservoir. This reservoir houses a water solution with dissolved nutrients. Wicks travel from the reservoir to the growing tray. Water and nutrients flow up the wick and saturate the growing media around the root systems of the plants. These wicks can be made of materials as simple as rope, string, or felt. Wicks absorb the water they are immersed in like a sponge, and when they come in contact with the spongy growing media, they transfer the nutrients from the solution to the roots.
C) Nutrient film technique systems:
Nutrient film technique systems hang the plants above a stream of continuously flowing nutrient solution that washes over the ends of the plants’ root systems. The channels holding the plants are tilted, allowing the water to run down the length of the grow tray before draining into the reservoir below. Unlike with deep water culture, the roots of the plants in an NFT system are not immersed in water. Instead, the stream (or “film”) only flows over the ends of the roots. The roots’ tips wick the moisture up into the plant, while the exposed root system is given plenty of access to oxygen. The bottoms of the channels are grooved, so the shallow film can pass over the root tips with ease. This also prevents the water from pooling or damming up against the root systems.
D) Ebb and flow systems:
Ebb and flow systems (also called flood and drain systems) are one of the most popular hydroponic growing methods. They work by flooding a grow bed with a nutrient solution from a reservoir below. The submersible pump in the reservoir is equipped with a timer. When the timer starts, the pump fills the grow bed with water and nutrients. When the timer stops, gravity slowly drains the water out of the grow bed and flushes it back into the reservoir. The system is equipped with an overflow tube to ensure that the flooding doesn’t surpass a certain level and damage the stalks and fruits of the plants.
Unlike the previous systems mentioned, the plants in an ebb and flow system are not constantly exposed to water. While the grow bed is flooded, the plants drink up the nutrient solution through their root systems. When the water ebbs and the grow bed empties, the roots dry out. The dry roots then oxygenate in the interval before the next flood. The length of time between floods is dictated by the size of your grow bed and the size of your plants.
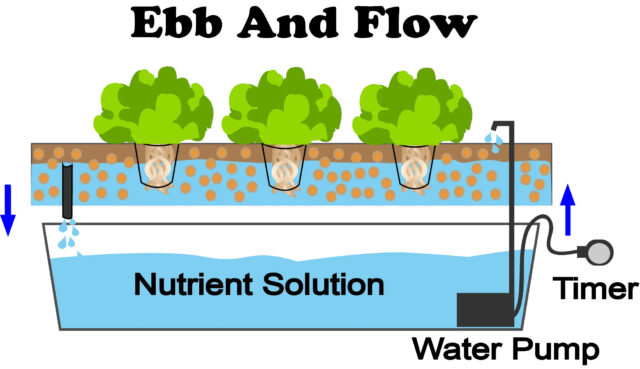
Credit: NoSoilSolutions.com
E) Drip systems:
An aerated and nutrient-rich reservoir pumps the solution through a network of tubes to individual plants. This solution is dripped slowly into the growing media surrounding the root systems, keeping the plants moist and well-nourished.
There are two configurations of drip systems: recovery and non-recovery.
In recovery systems, more popular with smaller, at-home growers, the excess water is drained from the grow bed back into the reservoir to be recirculated during the next drip cycle.
In non-recovery systems, the excess water drains out of the growing media and runs to waste. This method is more popular among commercial growers. Though non-recovery drip systems can sound wasteful, large-scale growers are very conservative with water usage.
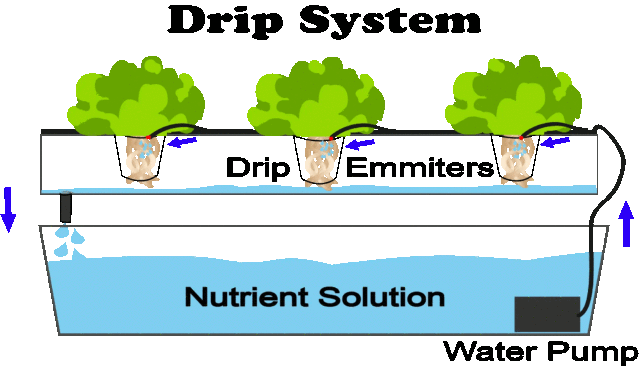
Credit: NoSoilSolutions.com
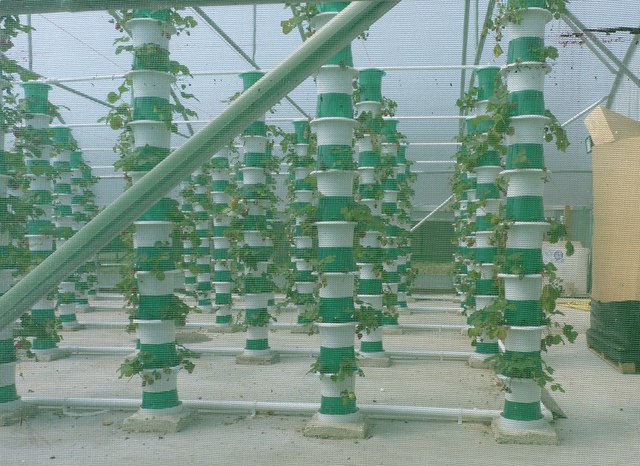
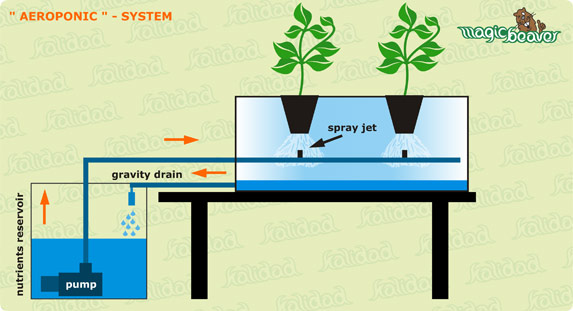
F) Aeroponics:
Aeroponics hangs plants in the air and exposes the naked roots to a nutrient-filled mist. Aeroponic systems are enclosed frameworks, like cubes or towers, that can hold a multitude of plants at once. Water and nutrients are stored in a reservoir, and then pumped into a nozzle that atomizes the solution and distributes it as a fine mist. The mist is usually released from the top of the tower, allowing it to flow down the chamber. Aeroponic systems use less water than any other form of hydroponics. In fact, it takes 95% less water than an irrigated field. Because of their maximized exposure to oxygen, aeroponic plants grow faster than other hydroponically grown plants. With aeroponics, great yields can be produced even in confined spaces.
Reverse osmosis and hydroponics
hen we truly invest in the health of our plants, we should equally care about the purity of the water sustaining them. Unfortunately, most water is full of contaminants.
The reverse osmosis (also called RO) process eliminates 98% of all impurities from water by forcing it through a semipermeable membrane. Reverse osmosis strips water of heavy metals, salts, bacteria, and total dissolved solids (TDS). The result is water of remarkable purity. Using RO water for hydroponics ensures that your plants drink up only the nutrients you want them to.
Food forest
(By Ragunath veeravel, 2019 kanthari. www.aaranya.org)
(Adapted from: https://grocycle.com/how-to-create-a-food-forest/)
In a traditional farm or garden, everything tends to be kept separate, vegetables planted in one area of the field, fruit trees in another, and a standalone herbs garden in yet another area.
A food forest combines all these different plants, herbs, trees, and vegetables in a way they might occur in nature.
Main purpose of a food forest:
The main goal of this food forest is to implement a system which combines agriculture and forest. A food forest is easy to maintain; it will improve the ecosystem, and in approximately three years, it can be self-reliant and sustainable.
Reasons for planting a food forest:
• A food forest will result in harvesting vegetables and fruits, throughout the year, that can be consumed in your venture’s kitchen.
• It can be used as a model training ground.
• It beautifies the landscape.
• A forest in your garden will influence the climate positively.
• And it ensures biodiversity.
The food forest is designed after the patterns of a natural forest. A forest develops over time layer by layer.
Layers of a food forest:
While developing a food forest, we need to consider the different layers (from the top to the bottom).
A) Overstory layer or canopy
The canopy layer consists of the crowns, branches, twigs, leaves, and fruits of tall fruit and nut trees. It receives the most sunlight.
B) Understory layer
Also sometimes called the lower tree layer, the understory layer collects only the light that gets through the overstory layer. This layer can be particularly lucrative in terms of income-generating crops. It contains dwarf fruit and nut trees, easy to reach for the farmers and the animals.
C) Shrub layer
Also referred to as the brush layer, this is one of the thickest and most dense parts of the forest. Here you can plant berry bushes and useful shrubs.
D) Herbaceous layer
The herbaceous layer can include medicinal and herbaceous herbs, as well as companion plants and plants to attract bees or birds. Research bee- and bird-friendly flowers, herbs and vegetables. But be aware: this layer contains a lot of shady areas.
E) Vine layer
Plants in the vine layer are specially adapted to use species in other layers as a form of support. They use other plants to gain exposure to the sun, which they otherwise might not be able to reach.
F) Ground cover layer
Sometimes called the horizontal layer, typically, plants in this layer grow big and weedy throughout the season, and then die off, only to regrow the next year. You need to consider low-growing ground covers (you will need to check what kinds of seasons there are in your area and select the right plants accordingly).
G) Root layer or rhizosphere
It is called the rhizosphere or root layer. Usually, the root layer consists of not only tree roots and root-based plants like carrots but also fungi.
H) Mycelium layer
Mycelium is the vegetative part of a fungus or a fungus-like bacterial colony, consisting of a mass of branching, thread-like hyphae. The mass of hyphae is sometimes called shiro, especially within the fairy ring fungi. Fungal colonies composed of mycelium are found in and on soil and many other substrates.
Mycelium will entangle the roots of plants and trees and nourish the plant life. Mycelium will help plants absorb water and nutrients, as well as build up the immunity of the trees and plants.
(More information can be found at: https://grocycle.com/how-to-create-a-food-forest/)
Phases of implementation
Creating a food forest involves three main phases:
Phase 1: Inspection and preparation of land
Phase 2: Execution and planting
Phase 3: Follow-up
Phase 1: Inspection & preparation
Step 1: Inspection and marking
To inspect the land, we need to check the following:
• Landscape
• Landform
• Soil
• Fauna and flora
Mark the planned pathways and planting areas with limestone powder or wooden pegs/ropes before the earthwork starts.
Step 2: Clearing
Then start with removing debris and weeds. Weeds take away the nutrition of the soil and restrict practical movement. If the area is big, you can use a JCB or a tractor to clean.
The pulled-out weeds need to be disposed away from the site; else they may regrow.
Step 3: Recovering
If a property has not been used for a long time, there might be a chance that weeds and wild grass have grown everywhere. These must be removed, as they will take away water. Recovering the land from grown wild bush/grass will help us to enrich the biomass and uplift the topsoil.
Step 4:
Once the land is recovered, the planting area, storage/resting area and roads need to be marked. Creating roads in the afforestation area is important to give access to earthmovers, trucks, and other vehicles.
Designing the master plan (landscape map) is important. Master plan includes the water line, structures and access that are needed for the food forest. All the requirements need to be added into a detailed map. For smaller planting areas, buying and storing plants may not be possible, so the planning would help us in space management as well as time management.
Phase 2: Execution and planting
Carefully select the tree species. It is important to plant as many different species as possible to increase the biodiversity. Make sure that you only plant indigenous species. Get native saplings from a nearby nursery. When choosing the plants, check their age and height.
The ideal starting height is 60 to 90 cm.
After weeding and marking, mounds should be created for planting, and each mound must be marked. A mound is a small soil projection, on the surface, with loose soil. It helps the soil to get aeration.
Planting
You can create small pits using a trowel, and gently place the plant in the pit on the mound. The idea is to plant on loose, aerated soil. These instructions and demonstrations need to be given to all the gardeners/volunteers. To maintain the aerated soil, workers should not walk on the loose soil mounds.
Selection of fruit trees
Depending on your location, you would need to choose indigenous fruit trees. The following fruit trees were taken into consideration for planting a food forest in tropical Kerala; of course, it may change according to the geographical area and availability.
• Papaya
• Guava
• Indian gooseberry
• Rambutan
• Soursop
• Mango
• Chikoo
• Pear fruit
• Drumstick
• Herbs like ashwagandha, apple mint, Mexican mint, catnip and tulsi.
Supporting trees like
• Teak
• Neem
• Veeti
• Tamarind
• Nutmeg and
• Shrubs like henna and Indian beech tree.
• Climber plants, like bitter gourd and watermelon, can be planted underneath the supporting trees.
Phase 3: Follow-up
In the next 1 to 2 years, you need to take good care of the saplings.
Choose an irrigation system: water hose with shower head, drip irrigation or water sprinkler.
The best method would be to use water hoses with shower heads. Watering should be done every day manually. The requirement is around 5 liters/square meter per day. This is important for three years after planting. During summer, we should be careful about evaporation; mulch (rice straw) can be used to maintain the moisture in the soil during dry/summer season. Weeding is to be carried out at regular intervals.